


What tyres does my electric bike need?
The post What tyres does my electric bike need? appeared first on Cycling Electric. If you’ve been riding for a while and your tread is starting to look a bit worn you may be wondering what tyres you’ll need for your electric bike. For the uninitiated it can be confusing navigating the various wheel sizes, tread patterns, rubber compounds for each weather condition and all manner of other jargon […] The post What tyres does my electric bike need? appeared first on Cycling Electric.

The post What tyres does my electric bike need? appeared first on Cycling Electric.
If you’ve been riding for a while and your tread is starting to look a bit worn you may be wondering what tyres you’ll need for your electric bike. For the uninitiated it can be confusing navigating the various wheel sizes, tread patterns, rubber compounds for each weather condition and all manner of other jargon you’ll likely encounter.
As we’ve previously done with other bike jargon we’ll decode everything you need to pick the right replacement tyre first time here.
What tyre size does my electric bike need?
One of the first things you’ll need to decipher is what size tyre you’ll need, that is both in terms of the wheel size it will adorn and the clearance you have in your frame and fork in terms of the tyre’s width.
A quick and easy way to determine the right product you’ll need, assuming you don’t want to make a deliberate change based on the ride feel of the tyre you’ve already had, is to check the sidewall of the current tyre for either print or molded rubber letters and numbers that indicate the size. Sometimes this will be in black, on a black backdrop, so you’ll need to look very closely if it’s not obvious. You may also find information here on the inflation levels suitable for the tyre.
The tyre’s diameter is crucial to get right, otherwise the tyre bead won’t seat properly on the rim, or fit at all. Generally speaking, you want no less than 6mm of clearance in width each side of the tyre when you are sat on a road or gravel bike, which will tend to have slimmer profile tyres and aerodynamic frames. You’ll need more clearance if you’re looking at a high volume tyre for a mountain bike; it goes without saying mud can cling to tyres and choke up frames that have poor tyre clearance.
Not exactly helping matters is the fact that there exists both a metric and imperial system of measurement, so many tyres will flag both measurements on sidewalls.
What tyres to look out for on adult bikes:
700c
If you have a road bike then you’ll more than likely be looking for the number 700 and letter c.
26, 27.5 (650b) or 29-inch wheels
For mountain bikes there are three common sizes in the modern day, though the former mainstay of 26-inch has steadily fallen out of favour and it’s likely that unless your bike is more than 10 years old you’ll now have a 27.5 or 29-inch tyre.
Confusing matters a little, 29-inch wheels will have the same bead diameter as a 700c wheel, while 27.5-inch wheels are sometimes also known as 650b wheels. The latter can be seen in both mountain biking and gravel riding.
Sorry, one more confusing thing… There is too another measurement style, known as ETRTO sizing. This is an internationally recognised ISO standard, but one you’ll encounter less. Nonetheless ETRTO is a diameter based system that equates a 700c/29-inch wheel to a 622mm diameter. A 650b and 27.5-inch wheel will be a 584mm diameter and a 26-inch a 559mm diameter.
In the case of ETRTO, you may see a format like 50-584, which essentially is the millimetre reading of a 27.5 x 2-inch tyre.

What width should the tyres on my bike be?
This will be determined by your frame and fork clearance, which will be outlined in your manufacturer’s handbook, or possibly online. There will be some flexibility here, so you may wish to choose a fatter width tyre for more traction, grip and balance, or a slimmer tyre for less rolling resistance, weight and greater clearance.
Typically road bike tyre widths will be measured in millimetres, as will many hybrid style bikes and gravel bike tyres. Mountain bike tyres and now some gravel tyres too are measured in inches.
It is becoming common on tarmac going bikes to spec a 25mm tyre, sometimes a little larger, though previously a slimmer 23c tyre was more common. Many modern road bikes offer clearance for up to 32mm in respect of the way road bikes are being used nowadays.
As for mountain bikes, it’s worth noting a recent trend for the back wheel to be smaller than the front. This is called a ‘mullet’ setup and often is seen with a 27.5-inch wheel at the rear and 29-inch at the front; this obviously means two different tyre sizes and tubes too. As for the width of the tyres, aa typical range is between 2-inches and 2.6-inches, though plus size tyres can be popular for deep backcountry explorers who wish to traverse looser ground where traction is key.
As for the middle ground, gravel bikes, first you need to suss out whether the wheel is 700c or 27.5-inch (650b). Then you can expect to find tyres from around 40mm to 50mm in width for a 700c wheel, edging up by 50% or so to 60mm for a 650b, at which point you may find the measurement expressed in inches, instead of mm.
What tyres does my bike need: Decoding the jargon
Tyre tread
This is the pattern on the surface of the tyre. It governs how much grip and traction you have, as well as the rolling resistance.
PSI / BAR (Pressure)
This is the air you put into the tyre, as measured by the pressure inside. A higher pressure means a firmer tyre, while you may run a tyre softer to get more grip.
Compound
This is to do with the make up of the rubber and governs how the tyre feels. Tyres may, for example, have a hard compound rubber in the centre to lower the rolling resistance and a softer compound on the edges to provide grip while cornering.
Puncture protection
Many tyres will have a protective band under the rubber that remains flexible, but is great at repelling things like glass or thorns. The more expensive a tyre is, the better you’ll find the protective layers to be, unless weight is the overall priority.
Tubeless and tubeless sealant
A tube-free tyre setup that has tubeless sealant inside will automatically reseal small punctures as the air pressure inside forces sealant toward the puncture hole where it will clog the hole and become air tight again.
When do I need to change my bike tyre?
What signs should you look out for on your tyres to know its time your bike deserves fresh rubber?
As a car would by law require 1.6mm of tread to remain legal, there is no such law for bikes, so really you should use common sense, or listen to your local bike shop mechanic when they say the time has come. A worn tyre is dangerous and will operate sub-optimally, from being more prone to puncture, right through to becoming too worn to grip the surface underneath your wheels.
What may become evident as you wear through a tyre is either fabric (the tyre casing) or metal showing beneath the rubber. This may happen first on a patch that has been skidded down, or more broadly across the whole tyre. No matter what one it is it’s time to change the tyres on your bike if you spot either.
With a slick tyre the signs are harder to spot, so look out for inset dots that are worn through, thus indicating a worn tyre.
What should you do if your bike tyres have holes, cuts or nicks? These can vary in severity and some require no action other than to remove the thorn or glass that may have caused them. If you have a tubeless tyre, these kinds of holes self seal and, for larger holes, you can use a tubeless tyre plug to repair holes of up to 3mm. If you have a tubed tyre you can use a puncture repair patch on the inner side of the tyre, or even a blob of superglue in some case just to firm up the area where a hole has been.
Major signs the tyre is not in the best shape include bulging, whereby the tyre casing is broken and the inner tube bubbles through the hole. This is a tyre replacement scenario.
Add to this, if the hole is significant in size, say large enough to push a pen through, then you may want to replace the tyre, or at the very least shore it up with something flexible tacked on the inside. This will get you home, but really you should be buying a new tyre soon after.
Finally, if you can see cracking in the tyre, especially on the sidewall, assess the situation to see if the tyre bead is detaching from the sidewall. This is another in the bin scenario as the tyre could suddenly tear more while riding, potentially making you lose control.

Do I need electric bike specific tyres?
The reasoning behind why you may wish to opt for a tyre that purports to be specifically for electric bikes is quite simple; it’ll be built to withstand the generally higher average forces asked of an e-bike versus a regular bicycle. It’s not essential you have an e-bike specific tyre, but it’ll certainly last longer and do a better job.
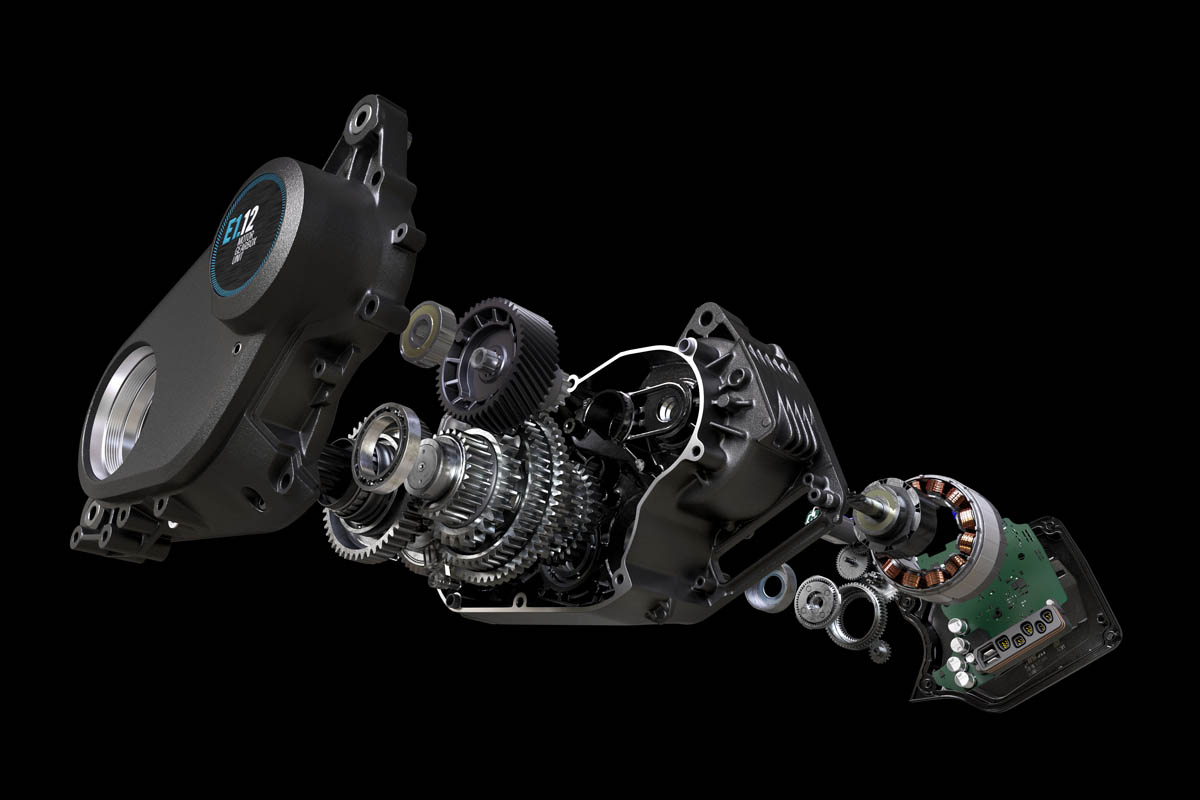
Consider this, an electric bike will typically cover more ground, be taken out more often and there will generally be higher torque put through the wheels, plus larger braking forces too.
If you’re going to do one thing when upgrading your e-bike tyres, at the very least don’t go for the cheapest option. Talk to your local bike shop about the tyres and brands they recommend based on your riding patterns. Find a tyre that has a higher load capacity, better puncture protection and a more robust overall construction.
What should I look for in the tread pattern?
Slick
A slick tyre will be best suited to covering ground, almost exclusively on the tarmac, though a fine gravel path may fly if you’re a confident rider. These tyres will tend to be run at a high pressure and have the lowest rolling resistance in order to promote high speed and distance coverage.
Semi-slick and gravel
A semi-slick tyre will have some tread on the surface and likely be a bit wider. They will be run at a slightly lower pressure than slick tyres, but will still be firm in order to cover ground efficiently. The tread will give some traction and grip on gravel paths and enable you to head off road, as long as the path underfoot isn’t too loose or variable.
Rugged
A more rugged tyre will be better suited to going off road and will run at a lower pressure in order to deform around rocks and roots in the trail, as well as promote high traction. Mountain bikers will tend to find the sweetspot based on their local terrain and the conditions outside, combining pressure, tread and tyre width to match up with their riding style. A cross country rider, for example, may choose a thinner width and higher pressure, versus a downhill rider who will want a wider tyre and maximum grip.
Choosing a tube or tubeless bike tyre
What about if your bike has tubeless tyres? You may be aware that your bike either has tubeless tyres, or has a tubeless-ready rim and tyre that is currently occupied by a tube but ready to be upgraded.
The benefit of tubeless bike tyres is to enable you to ride tyres at lower pressures, which helps your traction and the tyre to deform to features under the wheel without so much risk of puncture. The rolling resistance too should be lessened, while your punctures will self seal if they are not serious in size. Of course tubeless tyres are more expensive all in, but you may find the pros outweigh the cons if you ride a lot.
Fitting a tubeless tyre is no at home task, you’ll need a high pressure air delivery to seat a tubeless tyre, otherwise you’ll likely experience a sticky situation – this stuff can get everywhere if you don’t have the right tools to seat a tubeless tyre. As ever, we whole-heartedly recommend your local bike shop’s assistance.
So, to cut a long-story short, what is a tubeless bike tyre? It is a sealant filled tyre that instead of an inner tube seals tightly to the wheel to trap in air. They rely on a bespoke shape and tightness of the tyre bead to snap precisely to the rim and hold at high pressure.
A tape seals up the rim bed, while a special fitted tubeless valve will govern the flow of air into the tyre. All of this adds a bit of cost if you are upgrading, inclusive of the cost of the sealant that protects the tyre from punctures. This needs to be kept semi-fresh, in that you will need to change or top it up periodically to stop it drying out and becoming ineffective and adding needless weight to your bike.
While tubeless tyres used to be the preserve of off road riders, increasingly road cyclists and gravel riders are finding it a worthy upgrade now that products are more available.
An example of a kit to convert your bike to tubeless can be found here, while a typical tubeless repair kit looks like this.

How to change a bike tyre or tube
To begin this process, if you have one, mount your bike at chest height in a bike stand like the affordable Torque bike stand we reviewed last year. Having a bike at eye-level makes it so much easier to maintain, plus you’ll not strain your back or get mucky knees from leaning down all the time.
When it comes to changing a bike tyre, you’re going to have to know how to take the wheel off the bike. In many instances you’ll have either a quick release lever to unwind, or a thru-axle that will have an Allen key indent to undo. In the case of the former you can just unwind the quick release a little and slip the wheel out, but if it’s a thru-axle you’ll have to slide it out of the hub to remove the wheel.
Once your wheel is off, deflate the tyre until the vast majority of the air is out. This will make it a lot easier to get the tyre off the rim. Often you’ll find its stuck to the rim, but you can work it loose easily with some gentle massaging with the thumbs to create a gap between the tyre and rim.
From here, if you have them, insert a pair of tyre levers under the tyre perhaps four inches apart. Hooking under the tyre you can lever the tyre over the rim. If it’s loose fitting or old you may find it comes off easily by pushing the tyre down over the rim inch by inch as you move around the rim. If it’s on there tighter, continue to use the tyre levers to work along the rim, gradually lifting more of the tyre off inch-by-inch until you can remove the entire thing.
Once you’ve take the old tyre off, get hold of the new tyre and inner tube, placing the tube inside the bike tyre and inflating it just slightly. Align the valve to the hole in the rim, pop it in and then proceed to seat the back side of the tyre around the rim, first one wall and then the other. You can deploy the tyre levers again here to help seat the tyre by again getting the lever between the tyre and the rim and pushing the lever upwards.
Once both sides of the tyre are seated you can then proceed to inflate the tyre to the recommended level, as found on the tyre’s sidewall. Look out for the PSI or BAR metric for the pressure needed.
The post What tyres does my electric bike need? appeared first on Cycling Electric.
What's Your Reaction?