MyVeloFit Setup Instructions
Our AI is pretty clever, but it’s only as good as the video you give it. Follow the Rider, Camera, and Recording Instructions below to ensure reliable results and avoid issues. Skipping any of these steps may impact your results. Bike Fit Rider Instructions Attire: Wear snug fitting clothing that contrasts with your background. Avoid wearing one single colour, especially all black. Footwear: Use the shoes you typically cycle in. Ensure your cleat position is set before starting. When using flat pedals, maintain consistent foot placement across videos. Warm-Up: Dedicate 10-15 minutes to warm up by riding beforehand. This will simulate your natural riding conditions for a more accurate fit. Posture: Maintain your typical “all day” riding position with arms relaxed and looking forward. Hand Positioning: Keep your hands in their primary position based on your bike type: Drop Bar […]
Our AI is pretty clever, but it’s only as good as the video you give it. Follow the Rider, Camera, and Recording Instructions below to ensure reliable results and avoid issues.
Skipping any of these steps may impact your results.
Bike Fit Rider Instructions
Attire: Wear snug fitting clothing that contrasts with your background. Avoid wearing one single colour, especially all black.
Footwear: Use the shoes you typically cycle in. Ensure your cleat position is set before starting. When using flat pedals, maintain consistent foot placement across videos.
Warm-Up: Dedicate 10-15 minutes to warm up by riding beforehand. This will simulate your natural riding conditions for a more accurate fit.
Posture: Maintain your typical “all day” riding position with arms relaxed and looking forward.
Hand Positioning: Keep your hands in their primary position based on your bike type:
- Drop Bar Bikes (Road, Gravel, etc.): On the hoods.
- Triathlon & TT Bikes: In the aero bars.
- MTB or Hybrid Bikes: On the grips.
Pedalling: Maintain a natural cadence (generally 75-95 RPM) with a comfortable level of resistance on the trainer. Do not pedal slowly.
Bike & Camera Setup
Bike: Ensure your bike is appropriately mounted on the trainer and it’s axles are approximately level during your fit.
Lighting: Ensure you’re in a well-lit room to maintain good contrast. Clear, well-lit videos will ensure best results.
Background: Avoid other people, pictures of people, and mirrors in the video. Other people visible in the video are likely to impact results.
Camera Stability: For the best accuracy and consistency use a tripod. Otherwise, stable hand-held videos or cameras propped on steady surfaces like books are acceptable.
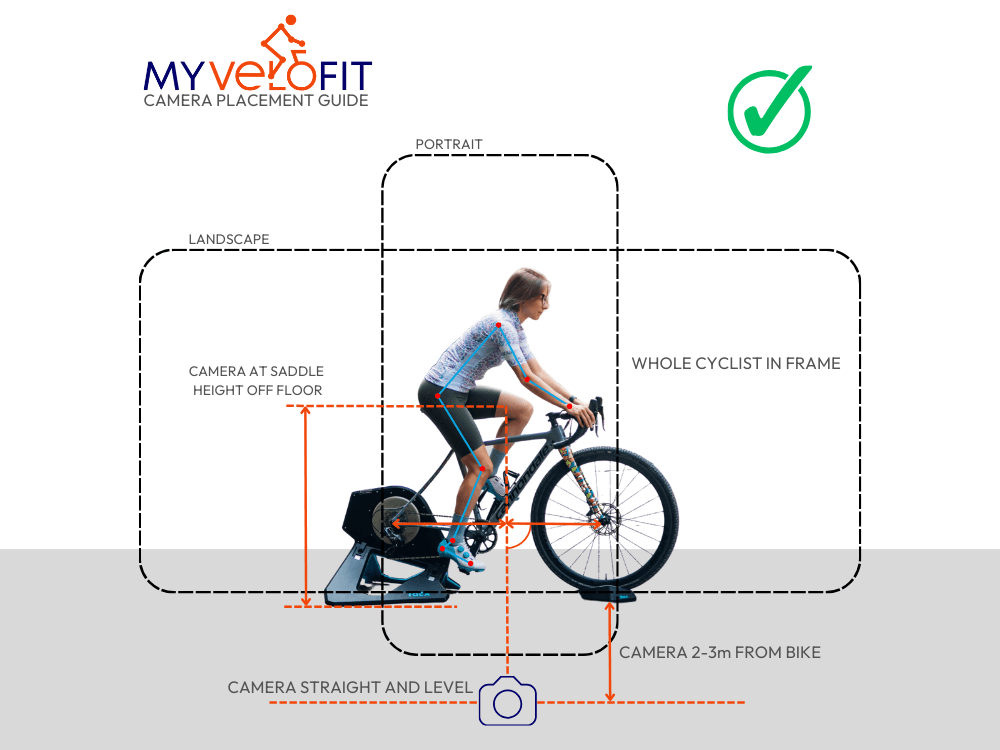
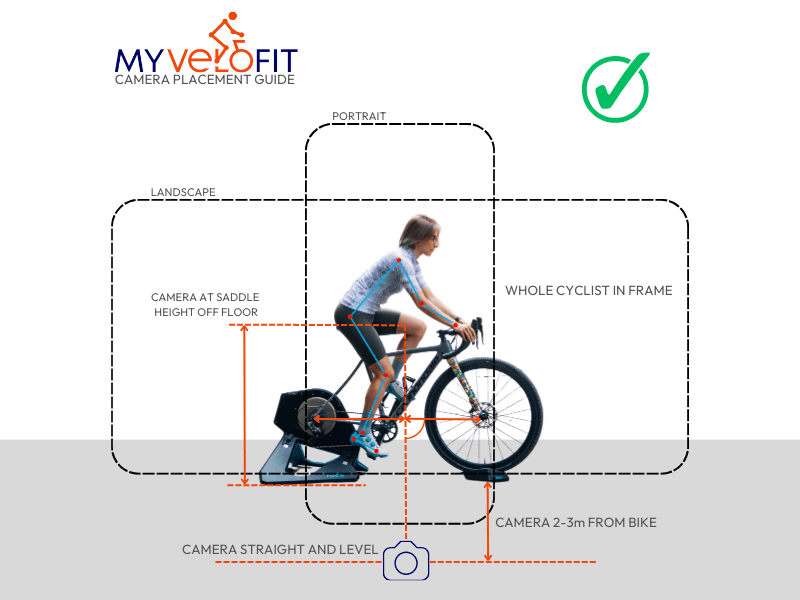
Camera Distance: Your entire body, from head to toe, must be continuously visible in the video frame. This typically requires the camera to be 2-3m from the bike.
Camera Angle & Height:
– Position the camera to capture your side view (left or right) ensuring it’s centred on the bike, square to you and level.
– It must be approximately saddle height off the ground.
Consistency: Mark on the floor (or note) the location of both the rider and the camera. Replicate the placement during future videos for the best repeatability.
Recording the Video
Orientation: When possible record in landscape (horizontal) orientation. Turn off rotation lock (if on) when recording with a phone.
Camera Settings:
- Use standard camera settings. Avoid ‘wide’ or ‘ultra-wide’ options, often labeled as ‘0.5x’ or similar in camera apps.
- Refrain from recording in high resolutions like 4K, as it provides no benefit for analysis and will increase upload times.
Video Length: Record a brief video, Ideally 15-20 seconds of riding.
Trimming: Trim the video before uploading, removing sections of mounting/dismounting the bike or starting/stopping pedalling.
What's Your Reaction?


